


WLED APP
This page provides some basic details on WLED setup and interface. WLED is a free and opensource LED controller application designed by the open source community. It is fully customisable and although it looks complicated at first glance, once you start to play with it you'll quickly understand why I've chosen to use it with my art.
All of my lights have WLED pre-installed on the controller. It works across your wifi network and can be controlled using a free app which you can find on the Appstore or the Playstore.
You can find out more about WLED at https://kno.wled.ge/

1. Connect to the Light's Wi-Fi
When you power on your light for the first time:
-
Open your phone's Wi-Fi settings.
-
Look for a network called WLED-AP
-
Connect to it. (If required password is wled1234)
-
The WLED AP should open.

WLED has alot more to it beyond the scope of these basic setup instructions. If you want to do a deeper dive and learn a bit more, please check out their webpage at https://kno.wled.ge/
2. Give the light permission to connect to your home WiFi.
In the wled app go to the config menu, and open WiFi Setup.
Click "Scan" and find your home wifi network from the list, enter your home wifi password and click "Save and Connect"

Note: Your light is not connecting to the internet, it is only using WiFi as a signal between your phone and the controller.
If your WiFi network changes you can follow these same steps to set your light up on your new network.
3. Download the app and control the Light
Once connected to your wifi
-
Download the WLED app (iOS or Android) to your phone.
-
Open the app. It should auto-detect your light.
-
If not, tap +, then Enter IP manually and type the light’s IP address (shown in the setup screen or your router).
-
-
Use the app:
-
Choose effects like Rainbow, Fire, Twinkle.
-
Adjust brightness, speed, and intensity.
-
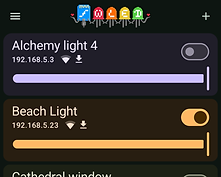
More than one light?
If you have more than one light using WLED they will all display and be accessable from the menu page.
Backup configuration and presets.
WLED is fully customisable, but if you need to revert you light to the original settings I recommend saving a backup copy of the preloaded configuration and preset files.
Open your light in the WLED app -
-
Open Config menu
-
Scroll down to Security and Updates.
-
At the bottom of that page you will find Backup & Restore options.
-
Click on Backup presets and save the file.
-
Do the same for Backup configuration.
To Restore either file
-
Click choose file
-
Select the file you have just saved.
-
Click upload.
You can also do this from your laptop if you have chrome browser.
-
Make sure your light is turned on and your laptop is connected to wifi.
-
Open Chrome browser and Type the ip address of the light into the URL address bar.
-
Follow backup instructions above.

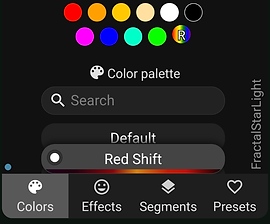
Using the app
There are four menus at the bottom of the screen.
Colors, Effects, Segments Presets.
Colors
The first five gradient options with an asterix * next to them can be changed with the colour wheel at the top. After this there are many preset gradients to choose from, as well as spaces at the bottom to create and save your own.
Effects
Programmed effects that come preinstalled with WLED. You can play around with the sliders at the bottom of the screen to change some of the parameters like effect speed, or width.
Presets
Presets can be saved here along with their segments, colours and effects settings. You can also choose with preset opens on boot. I've saved some of my favourite settings here to get you started. You can save and overwrite these settings as you wish. If you mess up just restore the preset file that you saved earlier.
Segments
This is a really cool feature of WLED where you can really start to control the effects.
Your light will comes configured with the correct number of pixels, but you can divide the strip of pixels into segments and control each segment seperately with different effects, colours, mirrored or reversed segments and so on.
Peek
If you turn on the Peek option at the top of the screen it gives you a live example of what the light settings for each segment might look like as you change them.
In the example below you can see that the first Segment (segment 0) have the red shift color gradient, while the second or (Segment 1) is still on solid orange.
